> ## Documentation Index
> Fetch the complete documentation index at: https://docs.autheo.com/llms.txt
> Use this file to discover all available pages before exploring further.
# Connect To Testnet
> Step-by-step guide to connecting MetaMask to the Autheo Testnet using a custom RPC network.
Interacting with Autheo's Testnet requires the use of a compatible [cryptocurrency wallet](https://en.wikipedia.org/wiki/Cryptocurrency_wallet). Autheo uses underlying EVM architecture and is compatible with most major Ethereum-focused wallets.
For the purposes of this document, we will be using a browser-based [MetaMask Wallet](https://metamask.io/). MetaMask is available through the Chrome store, Google Play store and Apple's App Store. Always visit the official MetaMask website to download the wallet application, to avoid phishing scams.
## Creating a custom network in MetaMask
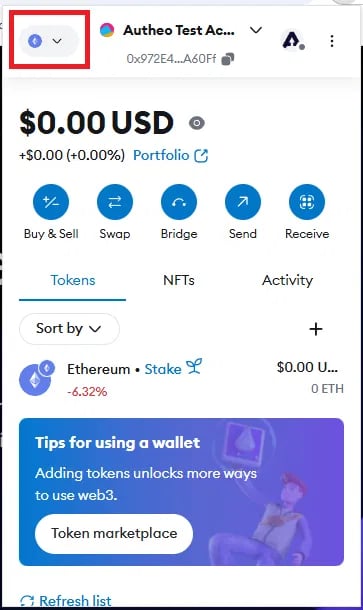 *Network selection icon outlined in red.*
Connecting MetaMask to the Autheo Testnet requires the creation of a custom network within your instance of the MetaMask wallet. Clicking on the icon in the upper left of your MetaMask window will bring you to the network selection page.
*Network selection icon outlined in red.*
Connecting MetaMask to the Autheo Testnet requires the creation of a custom network within your instance of the MetaMask wallet. Clicking on the icon in the upper left of your MetaMask window will bring you to the network selection page.
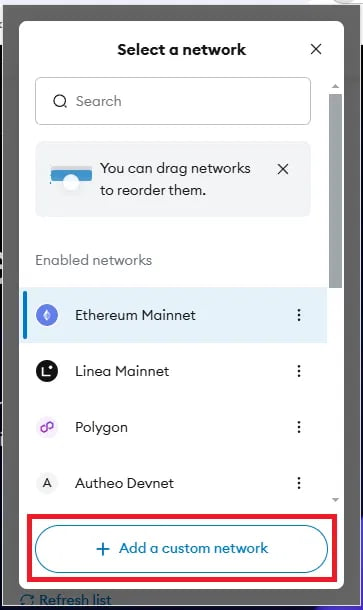 *Add a custom network button outlined in red.*
On the following screen, there is a large + Add a custom network button at the bottom. Click this button to open the custom network details form.
*Add a custom network button outlined in red.*
On the following screen, there is a large + Add a custom network button at the bottom. Click this button to open the custom network details form.
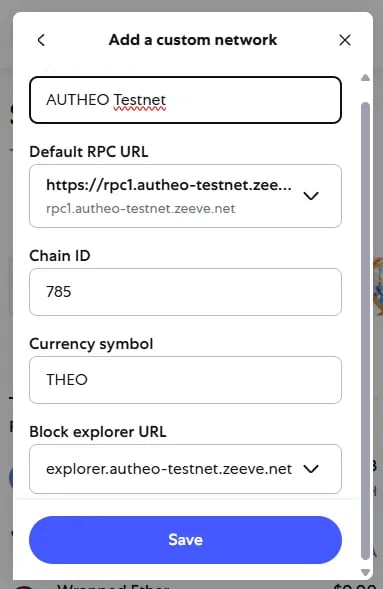 On the custom network details screen, you will need to enter the following information:
* Network name: AUTHEO Testnet
* Default RPC URL: `https://testnet-rpc1.autheo.com` (fallback: `https://testnet-rpc2.autheo.com`)
* Chain ID: 785
* Currency symbol: THEO
* Block explorer URL: [https://evm-explorer.autheo.com/](https://evm-explorer.autheo.com/)
The RPC URLs above are JSON-RPC endpoints — they accept `POST` requests from wallets and applications, not browser `GET` requests. Visiting them directly in a browser returns `405 Method Not Allowed`. This is expected behavior and does not indicate a problem with the network.
After inputting all necessary information, select **Save** to save the network to your MetaMask wallet. It will now be available from the previously shown network selection screen.
## Requesting Testnet THEO tokens
Autheo provides an automated "faucet" that distributes test THEO tokens for user and developer use in learning the platform or testing decentralized applications.
You can access the [Autheo Testnet faucet](https://testnet-faucet.autheo.com/).
You will need to enter your personal wallet address, which can be obtained at the top of your MetaMask window and will be a long alphanumeric value beginning with **0x** (Example: 0x972E44da6d56DFe14073e19DD4183caE7ebA60Ff).
You can request 2 THEO up to twice per 24 hour period. If you need additional Testnet THEO tokens, please contact Autheo's team directly.
On the custom network details screen, you will need to enter the following information:
* Network name: AUTHEO Testnet
* Default RPC URL: `https://testnet-rpc1.autheo.com` (fallback: `https://testnet-rpc2.autheo.com`)
* Chain ID: 785
* Currency symbol: THEO
* Block explorer URL: [https://evm-explorer.autheo.com/](https://evm-explorer.autheo.com/)
The RPC URLs above are JSON-RPC endpoints — they accept `POST` requests from wallets and applications, not browser `GET` requests. Visiting them directly in a browser returns `405 Method Not Allowed`. This is expected behavior and does not indicate a problem with the network.
After inputting all necessary information, select **Save** to save the network to your MetaMask wallet. It will now be available from the previously shown network selection screen.
## Requesting Testnet THEO tokens
Autheo provides an automated "faucet" that distributes test THEO tokens for user and developer use in learning the platform or testing decentralized applications.
You can access the [Autheo Testnet faucet](https://testnet-faucet.autheo.com/).
You will need to enter your personal wallet address, which can be obtained at the top of your MetaMask window and will be a long alphanumeric value beginning with **0x** (Example: 0x972E44da6d56DFe14073e19DD4183caE7ebA60Ff).
You can request 2 THEO up to twice per 24 hour period. If you need additional Testnet THEO tokens, please contact Autheo's team directly.